
Sue McCain
Hand Knitting Patterns


Sue McCain
Hand Knitting Patterns

Top-down set-in-sleeve sweaters are becoming increasingly popular, but many knitters are unfamiliar with their construction. I thought it would be helpful to explain how this type of sweater is worked, and to offer illustrations that will make it more easy to understand. This first post will be about working the back and front, and an additional post on working the body and sleeves will follow.
In most top-down set-in-sleeve patterns, you will begin by casting on stitches for the back of the sweater. If there won’t be any back neck shaping, then you will cast on all the stitches that you will need for the crossback (the total width of the back at the shoulders), which includes both shoulders and the neck.
If the pattern calls for back neck shaping, then you will cast on stitches for each shoulder (working with a separate ball of yarn for each shoulder), and will work the neck shaping given in the pattern. On the final row of neck shaping, you will work across the left shoulder stitches (the left shoulder as you would wear the piece is the first shoulder you work on when the right side of the back is facing you – patterns usually refer to right and left as you’re wearing the piece, not as the piece is facing you), cast on a number of stitches for the center of the neck (assuming that this is a round neck—a v-neck may not have a center stitch to cast on), then continuing with the same ball of yarn and cutting the second ball, join the right shoulder stitches and work across them to the end.
Whether you worked back neck shaping or not, you will continue to work back and forth on all the crossback stitches until you reach the length given in the pattern.
At this point, you will begin shaping the left and right armholes. This usually begins with increases worked at each armhole edge (i.e., at the beginning and end of the row) on every right-side row. Depending on the pattern, you may then follow the increases with a number of 2- or 3-stitch cast-ons. When you have completed the armhole shaping as given in the pattern, you will cut the yarn and place the completed back on waste yarn. Or if you have a spare circular needle of the same size (you can use a shorter one as long as all the stitches fit on it), you can just leave the stitches on the spare needle and start working on the front with a separate needle of the same size. (You could also use a smaller size circular needle as a holder for the back stitches, as long as you remember not to knit with it, since that would change your gauge.)
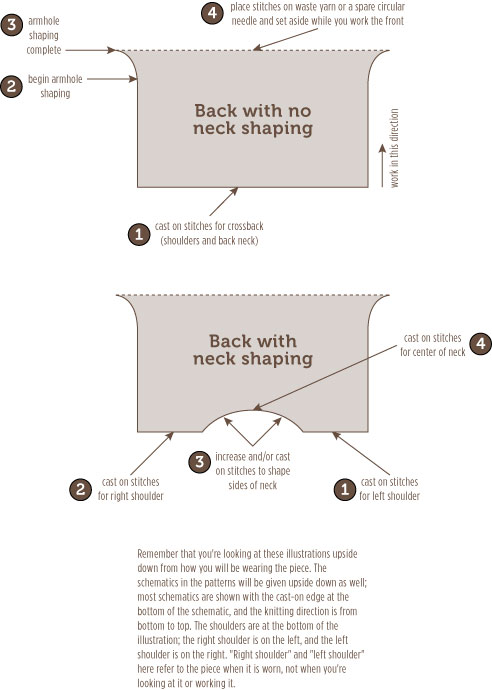
Once the back is completed and the stitches are placed on hold, it’s time to work the front. The pattern calls for you to pick up the front stitches from the stitches that were cast on when you first began to work the back; make sure you don’t pick up stitches from the stitches that you cast on for the armholes, nor from the back stitches on hold. If you worked neck shaping for the back neck. then you will probably be instructed to pick up 1 stitch in each of the stitches that you cast on for each shoulder. If you had no back neck shaping, but cast on stitches for the entire crossback at one time, then you will need to count in from each side (armhole) edge and place a marker to mark the end of the shoulder stitches (and the sides of the neck). For the right front, you will pick up the shoulder stitches from the side (armhole) edge to the first marker with one ball of yarn. For the left front, you will join a second ball and pick up stitches from the second marker to the armhole edge. Now you should have the front shoulder stitches on the needle, ready to work front neck shaping.
At this point, it doesn’t really matter whether you are working a pullover or a cardigan. You will be working back and forth on each side of the front until the required neck shaping is complete (where you’ll join the fronts for a pullover), or until the length at which you are to begin armhole shaping (in the case of a very deep neckline).
If you are working a shallow neckline, then you are likely to complete all the required neck shaping before beginning the armhole shaping. If you are working a pullover, you will cast on stitches for the center of the neck and join the pieces as you did for the back. If you are working a cardigan, you will continue working back and forth on the separate fronts. In either case, you will work back and forth until the required length at which you begin the armhole shaping. Then you’ll shape the armhole as you did for the back. Cut the yarn attached to the right front if you’re working split fronts.
Note that in the case of a deep neckline, the neck shaping may not be completed until well after the front and back have been joined; if that is the case, keep careful count of how many neck increases you have made. In my Basix patterns, I give you the number of stitches that you will have by the time your armhole shaping is complete; your numbers should match mine if your row gauge exactly matches mine, and your measurements exactly match mine. However, you may find that your numbers don’t match mine exactly; they might be off by a few stitches. Don’t let that worry you. If you have a slightly different row gauge from what the pattern called for, or if you measurements are slightly different from mine, that can easily cause you to work more or fewer neck increases by the time you complete the armhole shaping. The important thing is to make sure that your total number of neck increases matches mine when the neck shaping is complete.

I hope this gives you a better understanding of how a top-down set-in-sleeve sweater is put together. Continue with Part II: Body and Sleeves.
In Part I: Back and Front, I explained how to work the back and front(s), to the end of the armhole shaping. In this post, I take the next two steps, which are to work the body from the armholes to the bottom edge, and to pick up and work the sleeves from the armhole to the wrist.
Now that your armhole shaping is complete, you will need to join the front(s) and back to work the rest of the body of the sweater. If you are working a cardigan, or a pullover with a deep neck that continues after the armhole shaping is done, you will continue to work the piece back and forth. If you are working a pullover and the neck shaping is complete, you will begin working in the round.
In either case, the first thing you need to do is transfer the back stitches to the circular needle that holds the front stitches. If you’re working a cardigan or deep-neck pullover, you need to transfer the back stitches to the left-hand end of the circular needle, then the right front stitches to that same end. The left-hand end of the needle is the opposite end from the one with the working yarn. Once you transfer the stitches, you should have the left front, back, then right front on the needle, in that order from right to left, and the yarn should be attached to the left front, ready to go. If you’re working a pullover whose neck shaping is complete, then you transfer the back stitches to the left-hand end of the circular needle; you should have the front, then back on the needle, in that order.
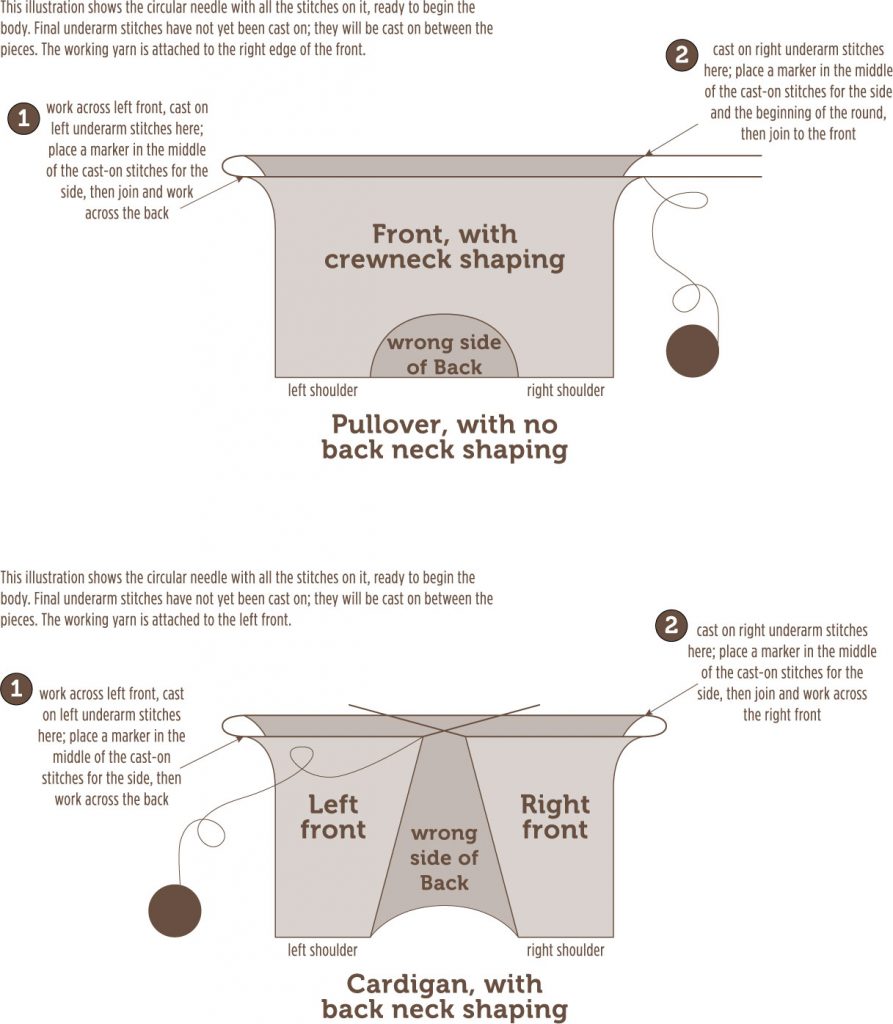
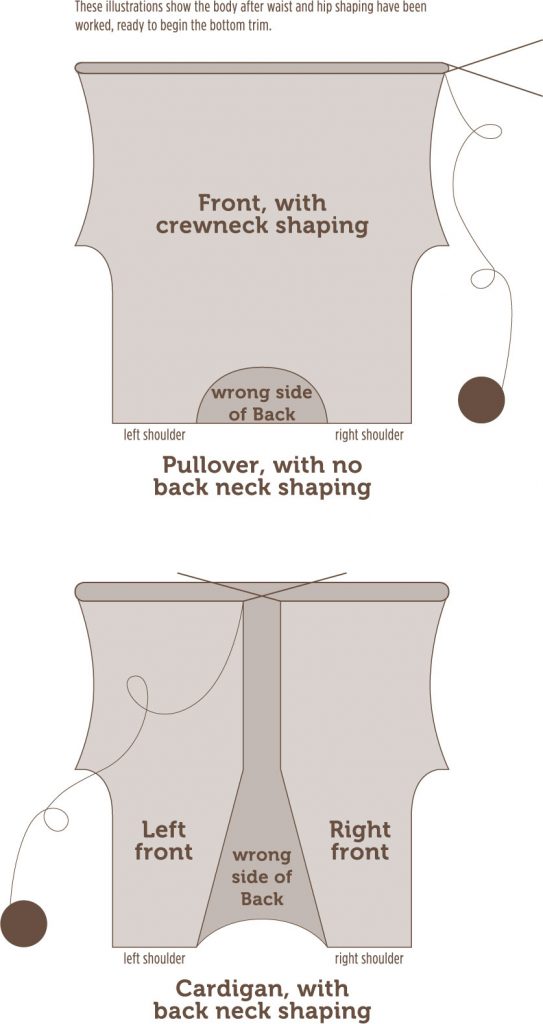
Once you have all the pieces on one needle, using only the ball of yarn attached to the first piece [and cutting the other ball(s)], work across the first piece, cast on the number of stitches indicated for the underarm, placing a marker in the middle of these cast-on stitches, work across the second piece and cast on the underarm stitches and place another marker in the middle of the cast-on stitches. If you’re working a completed front, the second marker will mark the beginning of the round, and you’re now ready to work in the round. If you’re working with a left and right front, work across the right front to the end. The markers you have placed will mark the sides of the sweater, and will be used for any waist and hip shaping that you do later.
Don’t join for the cardigan or the deep-neck pullover. Do join for the finished-neck pullover. Continue as instructed, working any waist or hip shaping specified, and finishing with the trim. For a deep-neck pullover, you will need to join the pieces when the neck shaping is completed. Note that for a very deep neck, you may not complete it until you have worked waist and/or hip shaping. Continue to keep track of your neck increases to make sure you complete all of them.
You may omit the waist and/or hip shaping if you prefer, change the length of the body from underarm to bind-off, and work a different trim if you’d like. If you want to try the piece on as you go, slip all the stitches onto a piece of waste yarn (removing the circular needle), and try it on. This will allow you to change where you begin the waist and hip shaping, and to shorten or lengthen the piece if you’d prefer.
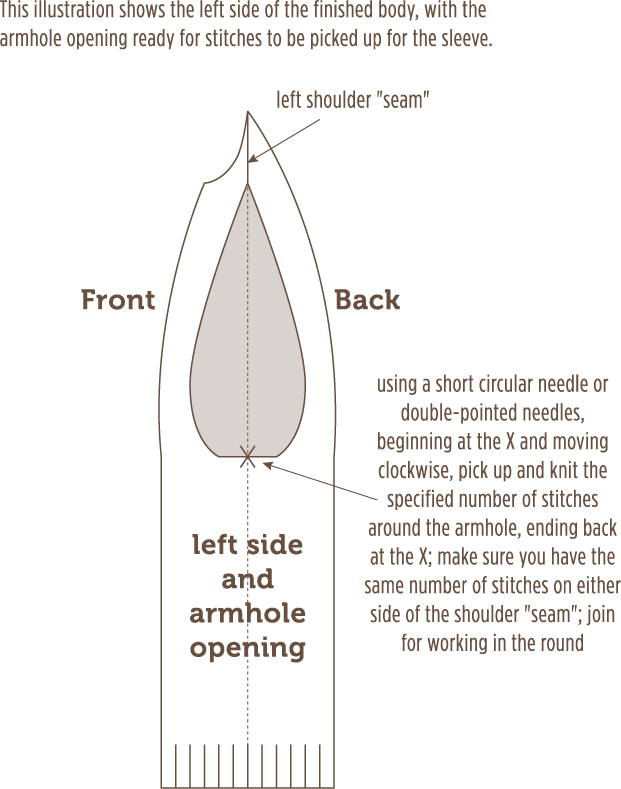
Once the body is completed, you’re ready to work the sleeves. These are worked from the top down as well. You begin picking up stitches at the center of the underarm stitches, and pick up evenly all the way around the armhole, ending back where you began. Make sure that you have the same number of stitches before the shoulder “seam” that you have after, and place a marker at the shoulder seam.
Once you have all the stitches picked up, you will join the sleeve to work in the round and begin shaping the cap of the sleeve. This is accomplished by working short rows back and forth. If you’re not familiar with short-row shaping, it is an ingenious technique whereby you work partial rows that allow you to create the curve of the cap without having to work the sleeve from the bottom up and sew it into the armhole. They create a bit of extra fabric so that the sleeve fits nicely over the shoulder and down the upper arm. The first and second short rows will take you slightly past the marker at the top of the sleeve cap, then the remaining short rows will continue the shaping down the sides of the sleeve until you reach the stitches that were cast on for the underarm. For the larger sizes, you will likely be short-rowing into those cast-on stitches. A lot of knitters are intimidated by short-row shaping, but if you following the instructions given in the Special Techniques section of the patterns, you will find that it is not difficult at all. I use what is called Japanese Short Rows because I think they are simpler than standard wrap-and-turn short rows, and I think they give a more finished look once completed. I have also become enamored with German Short Rows.
Once the short-row cap shaping is completed, you’re ready to work the rest of the sleeve in the round. You may change the length of the sleeve from underarm to bind-off, change the number of decreases so that the sleeve fits more tightly or loosely, and work a different trim if you’d like.

Short-row shaping is a way of working partial rows in order to create extra fabric. It can be used to shape one or both edges of a piece, or a section in the middle of the piece – actually, you can work it anywhere within a piece that needs extra fabric. You can work short rows for the bust or belly, or, as in the case of the Boston Top-Down Hooded Coat, to shape the hood. In top-down, set-in-sleeve knitting, short rows are used to shape the cap of the sleeve, so that it fits nicely over the outside of your shoulder and partway down the top of your upper arm.
Many knitters run away screaming when they hear “short-row shaping”; for some reason, there’s a rumor circulating that you need an advanced degree in order to do it. Not so! If you can count, slip a stitch and work two stitches together, you can do this. There are three common ways to work short row shaping: Wrap and turn, yarnover, and Japanese. Of these three methods, my favorite, and the one I’ll describe here, is Japanese Short Rows. I believe this method is easier to work, especially for less advanced knitters, and the shaping is less noticeable than in wrap-and-turn and yarnover short rows.
I have seen a few different takes on Japanese short rows, but what I will show you here seems to me to be the most straightforward way to work them. I’m going to walk you through step by step, with photos at the appropriate times; then at the end, I’ll give you a video that will show you the entire process.
The only special tools you’ll need are two safety pins (coilless is best) or two locking stitch markers. You don’t want to use an open removable stitch marker as it may slip off the yarn as you work. I recommend that you practice this on a knitted swatch, so that you can relax and not worry about making any mistakes.
With the right (knit) side of the work facing you, knit the number of stitches that is indicated in the pattern, then turn your piece so that the wrong (purl) side of the work is facing you. Slip the first stitch to the right-hand needle purlwise, and attach a safety pin or locking stitch marker to the working yarn (the yarn that goes to the ball). This is abbreviated in my patterns as t&s (turn and slip).
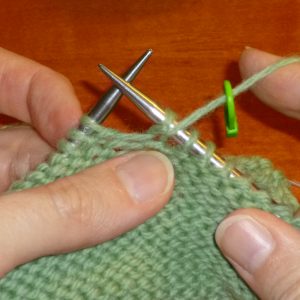
Next, keeping the marker snugged up against the work, purl the number of stitches indicated in the pattern. You’ll notice that when you purl the first stitch after attaching the marker, the marker will be clipped around the strand of yarn between the slipped stitch and the first stitch that you purl.
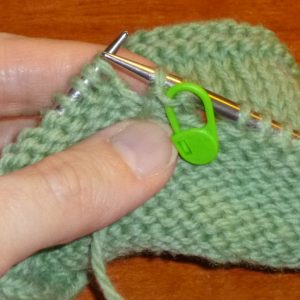
Turn the work so that the right side is facing again, slip the first stitch purlwise, and attach another safety pin or stitch marker to the working yarn. You’ve just worked two short rows! Are you still breathing?
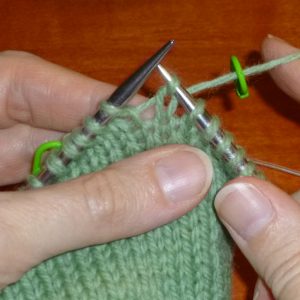
Now before you do anything else, look back at the two short rows that you just worked. You have a gap between the stitch that you just slipped on the last purl row, and the stitch to its right. And at the point where you turned and slipped the first stitch (on the previous knit row), you will see that you have a gap between the stitch that you slipped and the stitch to the left of it.

The instructions will tell you to knit to the first gap that you made and close the gap. Here’s how: The safety pin/marker is in the back, attached to the yarn below the last stitch on the right-hand needle. To close the gap on a right-side row, gently pull on the marker, and place the loop of yarn on the left-hand needle, making sure that the loop isn’t twisted.
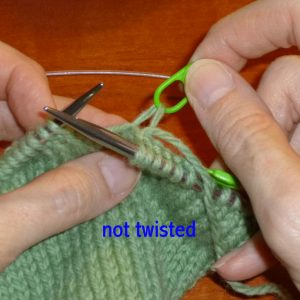
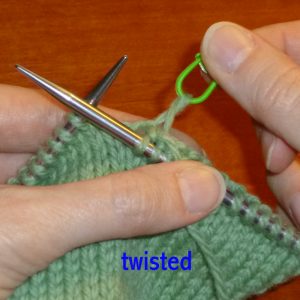
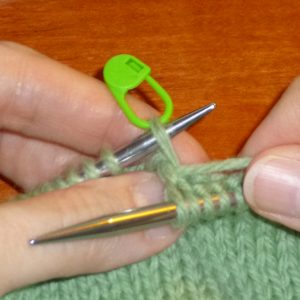
Knit the loop together with the next stitch on the left-hand needle. Remove the marker. You have now closed the gap.
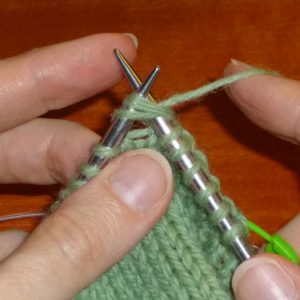
To close the gap when you’re on a wrong-side row, work to the gap. The marker is in the front this time. Slip the first stitch on the left-hand needle purlwise to the right-hand needle.

Gently pull on the marker and place the loop of yarn on the left-hand needle.
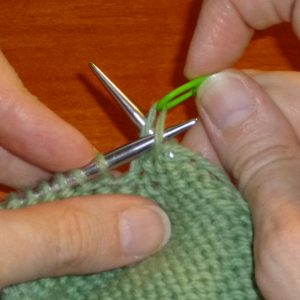
Return the slipped stitch from the right-hand back to the left-hand needle, then purl the two stitches together. Remove the marker. You’ve now closed the gap.

Here is a video that I made that shows you the above steps in motion. If you find the video helpful, please Like the video.
So now that you’ve survived working short rows, here’s what you can expect to see in a pattern that uses short rows. Most short-row instructions are written in pairs – you go out and come back (sometimes all the way back to the edge, sometimes only partway back if you’re doing shaping on both sides). Some designers and knitting publications number short rows singly (for example: Short Row 1: K25, t&s, purl to end). They consider that the shaping isn’t complete until you get back to where you started, and so in their mind, you’ve only worked one short row. My preference is to write it as two rows (see below), since you’re working one row on the right side, and one row on the wrong side. Sometimes you will start short-row shaping on a right-side row, and sometimes on a wrong-side row; either way, you will work in pairs of rows to work the shaping.
If you are working a piece like a scarf that has a curve along one edge, you will only short a stitch on one row, as follows:
Short Rows 1 and 2: K25, t&s, purl to end.
Here you short a stitch on Short Row 1, but then you just purl to the end of the row on Short Row 2 without shorting a stitch on the purl side.
If you’re working a piece like a sleeve cap that has shaping on either side of the shoulder marker, you will short a stitch on each of two rows, as follows:
Short Rows 1 and 2: K25, t&s, p10, t&s.
Here you’ve shorted a stitch on both rows, and you’re back on the right side again.
When working sleeve cap shaping in one of my top-down patterns, you will begin on a right-side row, and knit to a specified number of stitches past the shoulder marker, t&s, then purl to the same number of stitches past the marker on the other side, t&s. This will be called Short Rows 1 and 2. Then you go on to work Short Rows 3 and 4, which will be as follows:
Short Rows 3 and 4: Work to gap from last row, close gap, work 1 stitch, t&s.
So for Short Row 3, you work to the gap that you created when you worked t&s on the last right-side row (Short Row 1), close the gap, then work one more stitch, before you work t&s. This adds two stitches to the end of the row. Then you will work the exact same thing for Short Row 4, except that you’ll be working it on the wrong side. The text will tell you to repeat these two rows a specified number of times. Then in some cases, you will move on to Short Rows 5 and 6:
Short Rows 5 and 6: Work to gap from last row, close gap, t&s.
These two rows are similar to Short Rows 3 and 4, except that you don’t work an extra stitch after closing the gap; you just t&s right after closing the gap. These rows add one stitch to each end of the row.
Once you have completed all the short-row shaping, you’ll be back on the right side again. You knit across all of the stitches, closing the two remaining gaps as you come to them. If you’re working sleeve cap shaping, you can close the first gap that you come to as you have been doing. However, because the second gap was created when you were working on a wrong-side row (and it would normally be closed on the NEXT wrong-side row), it will have to be worked slightly differently when you close it on a right-side row. If you look at the gap with the right side facing, you will see that the marker, instead of being to the right of the gap, is to the left of the gap. To close this gap, work to one stitch before the gap, then slip the last stitch before the gap knitwise to the right-hand needle. Gently pull on the marker and place the loop of yarn knitwise on the left-hand needle, slip the stitch from the right-hand needle to the left-hand needle purlwise, and knit these two stitches together through the back loops. The final gap is now closed.
That’s all there is to it! It’s much more intimidating to read it through than it is to actually DO it. Don’t overthink it – grab yarn and needles and work up a swatch, then practice until it becomes second nature. Short rows can add so much to a project, so it’s well worth learning how!
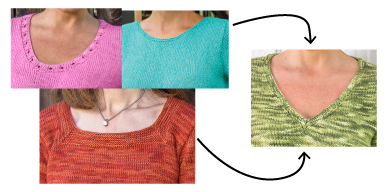
If you’ve found the perfect sweater pattern for you, except that it has a crew, scoop, or square neck, and you want a v-neck, never fear – you CAN convert the existing neck shaping to suit your taste.
As with any other changes you wish to make to an existing pattern, you must first know the stitch and row gauge of the yarn that you will be working with. Ideally your gauge matches the gauge given in the pattern. If your stitch gauge matches, but your row gauge does not, that’s okay; we can work with the actual row gauge you’re getting. In my instructions below, I’m going to use a stitch gauge of 4 and a row gauge of 6.
Converting a Crew, Scoop, or Square Neck to a V-Neck
Step 1
Determine how many stitches you have in the neck to work with. Let’s call this number A. If you’re working one of my top-down, set-in-sleeve patterns, the easiest way to determine the number of stitches is by adding up all the stitches that are cast on for the back neck. Keep in mind that you may be shaping the back neck, so you may cast on and increase stitches over several rows. I’m going to use a stitch count of 30 stitches for my sample neck.
Step 2
Divide A by 2 to get the number of increases to be worked on each side of the neck (call that number B). If you’re beginning with an odd number of stitches for the neck, first subtract 1 stitch from the neck total, then divide by 2. You will have to cast on a stitch at the base of the neck when you go to join the sides of the neck. I started out with 30 stitches; divide that by 2 and I end up with 15 stitches to increase on either side of the neck. If I had 31 stitches in my neck, I’d subtract 1 stitch (= 30), then divide that by 2 to get 15 stitches to be increased on either side.
Step 3
Decide how deep you want the neck to be. You might want to take the neck depth from an existing sweater that fits you well. If you’re planning a neckline that is deeper than the armhole depth, you want to make sure that the neck width is narrow enough that the sweater won’t fall off your shoulders. Depending on the style and fit of the piece, as well as the drape and weight of the yarn you’re using, I would keep the neck width under 9″ if it’s going to be very deep. If that’s what the pattern calls for, then you’re fine. If it calls for a wider neck, then you might want to adjust the neck width by working more stitches in the shoulders, and fewer in the neck. I’ve decided my neck depth will be 8″ deep.
Step 4
Multiply the desired neck depth by your row gauge, rounding that number to an odd number. The reason I round to an odd number is because in my top-down patterns, you pick up stitches for the front shoulder from the back shoulder, then begin by working a WS row. Since you will begin the neck shaping with a RS row, you have to work an odd number of rows from the pick-up row to the first shaping row.
I multiply 8″ by 6 rows per inch and get 48 rows for the neck. Since I have to have an odd number, I’ll round up to 49 rows. Now decide how many rows you want to work before you begin the neck shaping; make this an odd number. I usually work about 1 to 1.5″ before beginning shaping. Now subtract the work-even rows from the total neck rows to determine how many rows it will take you to shape the neck. I’ve decided to work 7 rows before beginning the shaping, so when I subtract that from 49, that means I have 42 rows in which to work the shaping. Let’s call this number C.
Step 5
Now it’s time to determine the intervals at which you will increase a stitch at each neck edge. First, divide the number of shaping rows in the neck (C) by the number of increases you have to work along each side of the neck (B). You will likely come up with a fraction; don’t worry – we can work around that. (If you get a number lower than 2, go to the Two-Stitch or Every-Row Increases section below.) I divide 42 shaping rows by 15 stitches to increase and come up with 2.8. Round that fraction to the nearest even number both above and below the fraction (4 and 2 – call these numbers D and E, respectively). You will work the increases every D rows x times, then every E rows y times. Since I round up to 4 and round down to 2, I will be increasing every 4 rows x times, then every 2 rows y times.
Step 6
The next calculation will tell you how many times you are to work each interval. Multiply the higher of the interval numbers (D) by the number of increases you have to work (B). Then take the resulting number (F) and subtract the number of shaping rows (C) from it (G). This gives you the number of times that you increase every E rows. Subtract G from the total number of increases (B) and divide the resulting number by 2, and you get the number of times that you increase every D rows (H). For my sample, I multiply the larger interval, 4 rows, by the number of increases (15), and get 60 rows, then subtract 42 shaping rows from that to get 18, which I then divide by 2 to get 9. So I have to increase every 2 rows 9 times. Subtract 9 from 15 (total number of increases), and I get 6, which is how many times I have to increase every 4 rows. So I will increase 1 stitch at each neck edge every 4th row 6 times, then every 2nd row 9 times.
Step 7
Once you’ve completed your increases, make sure you work a WS row (or several rows if you want to add a bit more length to your neck). Then on the neck RS row, work across the Right Front, cast on 1 stitch at the end of the Right Front if you need an odd number of stitches, then work across the Left Front.
To recap:
A = total neck stitches
A / 2 = number of increases to be worked on each side of the neck [(A-1) / 2 if you have need to have an odd number of neck stitches] = B
Neck depth x row gauge = total neck rows (round to an odd number)
Total neck rows – rows to work even before shaping (odd number) = C (neck shaping rows; should be an even number)
C / B; round this number up (D) and down (E) to nearest even number
((D x B) – C) / 2) = F (number of times to increase 1 stitch every E rows)
B – F = G (number of times to increase 1 stitch every D rows)
You will increase 1 st every D rows G times, then every E rows F times.
If You’re a Bit Intimidated
If this makes your head spin, try this: Divide the number of neck shaping rows (C) by the number of increases on either side of the neck (B), then round up and down to the nearest even number as in Step 5 above. Now play with your numbers until you can get in all the increases within your required number of neck shaping rows.
Here’s an illustration of this:
In my sample above, I’ve got 42 shaping rows and 15 increases, so I get 2.8 when I divide 15 into 42. I round up and down to 4 and 2. Rather than going through all those calculations in in my recap, I just decide to experiment.
If I work 2 increases every 4 rows (8 rows total) and 13 increases (15 – 2) every 2 rows (26 rows total), I end up with 34 rows. That doesn’t get me to 42 rows. So obviously I need to work more increases every 4 rows.
If I work 13 increases every 4 rows (52 rows total) – uh oh, that’s already too many. Try again.
If I work 8 increases every 4 rows (32 rows total) and 7 increases (15 – 8) every 2 rows (14 rows total), I end up with 46 rows. SO close. It’s 4 more rows than I need, so I’ll try working 1 fewer increase every 4 rows.
If I work 7 increases every 4 rows (28 rows total) and 8 increases (15 – 7) every 2 rows (16 rows total), I end up with 42 rows. Just right.
Two-Stitch or Every-Row Increases
If you’ve got a lot of neck stitches and not a lot of neck shaping rows, you may have to either work some 2-stitch increases, or work some increases every row. You’ll know that this is the case if you divide your shaping rows by your neck increases and you get a number that is less than 2. Here’s what to do if that happens:
Step 1
Divide the number of shaping rows (C) by 2.
Step 2
Subtract the resulting number from the number of increases (B). This is the number of 2-stitch increases that you need to work every RS row.
Step 3
Subtract that number from the number of RS increase rows, and you get the number of 1-st increases that you need to work every RS row.
Here’s what this looks like if you’ve got a total of 50 neck stitches (25 increases each side) and 42 shaping rows:
B = 25 increases
C = 42 total neck shaping rows
C / 2 = 21 RS neck shaping rows
B – 21 = 4 two-stitch increases worked every RS row
21 – 4 = 17 one-stitch increases worked every RS row
To make sure this works:
Verify the stitches: 4 increases x 2 stitches each increase = 8 stitches increased; 17 increases x 1 stitch each increase = 17 stitches increased; 8 + 17 = 25 total stitches increased.
Verify the rows: 4 + 17 = 21 RS increase rows, or 42 total increase rows (RS and WS).
If you don’t want to increase 2 sts on each shaping row, you can instead increase 2 stitches over 2 rows. In other words, you can increase on the RS, then increase again on the WS.
Using Graph Paper
Some knitters and designers like to work on graph paper to figure out how to work the shaping. Just make sure you use a pencil, and not a pen! 🙂 The advantage to this method is that it enables you to see how the shaping will look visually, especially if you work out the shaping on knitter’s graph paper, which you can format to match your stitch and row gauge. Even using graph paper, you’ll need to do some simple math to start out. Follow Steps 1 through 5 above to determine the intervals at which you will work your increases (for example, every 4 and 2 rows as in my sample), then play with the shaping on the graph paper until you get a shape that works for you.
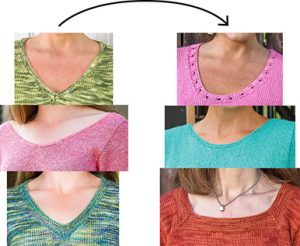
Using this tutorial, you will be able to take an existing top-down pattern and customize it to better suit your own taste.
When knitting from the top down, you will shape the neck by first working 1-stitch increases at each neck edge, then one or more small cast-ons (commonly 2 or 3 stitches, but sometimes more), then a final large cast-on that will bridge the gap between the sides of the front and allow you to join the two sides together. However, when designing a neck from the top-down, I always start at the base of the neck with the final cast-on, then the small cast-ons, then the increases; so I design backwards from how the piece is knit.
The first thing you need to know is how many stitches you have to work with in the neck. If you’re working one of my top-down patterns, there are two ways to do this:
If there is no back neck shaping (i.e., if you cast on stitches for the entire back shoulders and neck at the same time), then you should subtract the number of shoulder stitches that you pick up for each side of the front from the total back cast-on. For instance, if you cast on 60 stitches for the back, and you pick up and knit 15 stitches for each front shoulder, that will leave you with 30 stitches for the neck.
If there IS back neck shaping, then add up the number of stitches that you increase and cast on for the back neck, or subtract the number of stitches cast on for the shoulders from the total stitches that you end up with after the back neck shaping is complete and the sides are joined.
This is the easiest conversion to make. Simply work both sides of the front until you get to your desired neck depth, then work across the right front, cast on the total number of neck stitches needed, join the left front, and work across the left front to the end. Done!
When you are working a top-down crew or scoop neck, you usually begin the neck shaping with single increases on either side, then you cast on a small number of stitches (usually 2, 3, 4, and/or 5, depending on your size and stitch gauge) over a number of right-side rows. Then you cast on a large number of stitches for the center base of the neck and join the two sides of the front.
Your gauge and the desired depth of your neck will determine how quickly the shaping needs to be completed. The larger the gauge and the shallower the neck, the more stitches you will have to cast on and the fewer single-stitch increases you will work. The finer the gauge and the deeper the neck, the more single-stitch increases you will work. However, you need to have at least some small cast-ons in order to give the base of the neck a rounded shape. If you want the shaping to be completed quickly, make your small cast-ons larger (say, 4 or 5 stitches) before casting on the final base and joining. Play with it on graph paper to find your desired look.
I’ll use a stitch gauge of 4, a row gauge of 6, and a neck stitch count of 30 for my calculations.
Once you have determined the total number of neck stitches called for in your pattern, you’re ready to begin your conversion. When working a rounded neck, whether it is a shallow crew or a deeper scoop, you will always cast on a number of stitches at the base of the neck, where you join the two front sides. In a shallower neck, this number is usually around 1/3 of the total neck stitches; in a deeper neck, it may be a smaller percentage of the total stitches. Ultimately you get to decide whether you want the base of the neck to be wide or narrow – it’s largely a style decision. For now, we’ll go with 1/3 for our calculations.
With our stitch count of 30 stitches for the neck, 1/3 gives us an even 10 stitches. You’ll obviously have to round the number up or down to work with the number of neck stitches you have. So when we have finished shaping the sides of the neck, we will cast on 10 stitches for the center of the neck.
Next we have to determine how many stitches we have to increase and/or cast on for each side of the neck, leading up to the center cast-on. So subtract the 10 center stitches from the total 30 neck stitches and you get 20 stitches; divide that by the two sides of the neck, and you have to increase and/or cast on 10 stitches for each side.
How I work the side-of-neck shaping depends partly on the depth of the neck and partly on the style of the piece. The average crewneck depth ranges from 2–3.5″ (though that’s not a hard-and-fast rule), and a scoop neck is anything longer than that length.
For most shallower neck depths, you will increase a number of stitches on each side, then cast on a small number of stitches one or more times. The finer your gauge, the more stitches you will want to cast on before getting to the final center cast-on. Otherwise, if you only work increases on each side and no small cast-ons, it will take you a long time to get to your desired neck stitches, and you will lose some of the rounded shape of the neck.
Let’s assume that we will cast on 3 stitches once right before the 10-stitch base cast-on, and 2 stitches twice before that. That means you’re casting on a total of 7 stitches (3 + 2 + 2) on either side. Subtract that from the total of 10 stitches that you need to increase/cast on on either side, and you’ve got 3 stitches that you will need to increase.
This is where the depth of your neck comes into play. We’ve planned for the base center cast-on, and one 3-stitch and two 2-stitch cast-ons on either side. That much will take you 7 rows to complete, beginning and ending with a right-side row. Now calculate the total number of rows in your neck depth; simply multiply your desired neck depth by your row gauge and round to an odd number.
After the shoulder pick-up row, you will begin with a wrong-side row; you will end all neck shaping with a right-side row on which you cast on the center neck stitches and join the fronts. Subtract the 7 rows that it will take you to complete the cast-ons at the end of the neck shaping (or however many rows it will take you if you choose to work more or fewer small cast-ons). Unless you have a very shallow neck depth, I would recommend that you work about an inch even at the top of the neck, before beginning shaping. So at our row gauge, that would mean 6 rows (including the pick-up row), since we have to begin with the right-side pick-up row and end with a wrong-side row.
So let’s say you want a 3″ neck depth. Multiply 3″ by the row gauge of 6 to get 18 shaping rows, then round up to 19, an odd number. Subtract the 6 even rows at the beginning of the neck (pick-up row and following 5 rows) and the 7 cast-on rows at the bottom of the neck, and you’re left with 6 rows over which to increase stitches. Divide the 6 rows by the 3 stitches that we have to increase on each side, and we get a nice round 2, which means that we’ll increase 1 stitch every 2 rows, or on every right-side row between the work-even rows and the first cast-on row.
If your neck depth is 5″, you will have 31 shaping rows to work with (5″ x 6 rows per inch = 30 rows, rounded up to 31, an odd number). Subtract the 6 rows at the beginning and the 7 rows at the base from 31 and you have 18 rows in which to work the increases. You work the first increase on Row 7 (the row right after the pick-up row and 5 work-even rows), then you have 17 rows left to work the remaining 2 increases. Divide 17 by 2 and you get 8 (rounded down from 8.5). So work the next increase on the 8th row after the first increase (Row 15), then on the following 8th row (Row 23). On the next two RS rows (Rows 25 and 27), cast on 2 stitches to each neck edge. On Row 29, cast on 3 stitches to each neck edge, then on Row 31, cast on the center 10 stitches, and join the fronts.
While I was writing the above, I initially began by only calling for one 2-stitch cast-on on each side, which would have left me with 5 stitches to increase on each side over 8 rows, given my neck depth of 3″. Divide 8 by 5 and you get 1.6, not the nice even 2 that we got above. That means I would have had to increase 1 stitch every 1.6 rows, which would work out to 1 stitch every right-side row, with a single wrong-side increase stuck in toward the beginning of the increases. I prefer to avoid working wrong-side row increases, since increasing every row can make the fabric bunch up. So I decided to work two 2-stitch cast-ons instead of one, which enabled me to fit the increases smoothly into the available shaping rows.
So if you have a shallow neck depth or are working with a heavier weight yarn, you may need to cast on more stitches toward the base of the neck and reduce the number of increases you work so that you can complete the shaping in the depth you have to work with. You can cast on a larger number of stitches in your final center neck cast-on, but that will make the bottom of the neck broader, which will affect how it looks.
A broad center cast-on is appropriate if you want to shape the back neck (I usually figure somewhere around 80% of the total neck stitches), but it may not give you the results you’re looking for on the front. That said, there’s no reason you can’t have a broad center cast-on, larger side cast-ons, and few side increases so that all of the neck shaping is completed quickly. It’ll depend on the look you’re going for.
You might find it easier to plot out the neck shaping on graph paper. I would recommend creating your own graph paper using your specific stitch and row gauges (use Excel or go to http://sweaterscapes.com/lcharts3.htm and follow their instructions). Make sure to label the right-side and wrong-side rows on your graph. The cast-ons and join are worked on right-side rows. Play with the shaping until you get the look that you want.
If you’re working a bottom-up pattern rather than a top-down one, you can use the same process to convert the pattern’s neck. You will be binding off and decreasing stitches instead of increasing and casting on stitches.
To determine when to begin the neck, subtract your desired neck depth from the total length from beginning of armhole to top of shoulder (including the shoulder shaping length if you have to shape the shoulders); this is the point at which you will begin your shaping. When you get to that length, work across to the stitches that you have calculated for the center base of the neck. Bind off those stitches and work to the end. You may either work both sides at the same time with separate balls of yarn, or work each side separately. Bind off the small numbers of stitches at either neck edge, then decrease 1 st the determined number of times.
For instance, if I were working bottom-up with the numbers I calculated above, I would work to the center 10 stitches, bind off those stitches, then bind off 3 stitches at each neck edge once, then 2 stitches twice. Then I would decrease 1 stitch at each neck edge on the next 3 right-side rows. Finally, I would work even until the shoulder shaping is complete. Keep in mind that you might have to begin shoulder shaping while you finish up the neck shaping.
That’s all there is to it. It’s a lot more intimidating to think about it than it is to do it.